

3 Shoulder Positions for Efficient Handstands
A while ago, I posted a video about the priority level for different form cues. 1st priority was just getting used to being upside down; the 2nd priority was learning to use your hands; and the 3rd priority - the one we’ll be focusing on today - is shoulder positioning.

Handstand priority 2: Head and Hand positioning, as well as priority 3: Shoulder positioning
Learning the correct shoulder positioning will make your handstand more efficient. It will help you control your handstand more efficiently, and will also help when doing shapes and other handstand related skills.

You can check the full Youtube video out here
Having the correct shoulder positioning is a huge part of learning how to handstand properly. Keep these three things in mind, which we will go into detail on below, and learn how to do them:
Shoulder elevation : with shoulder elevation, try to imagine pushing yourself away from the floor as much as possible. Another way to think about it is to try to make yourself taller and taller, while in the handstand.
Shoulder flexion: shoulder flexion means getting your shoulders in line with your upper body. Another way to put it is to say you are ‘opening’ your shoulders.
Internal rotation of the shoulders - internal rotation of the shoulders means pointing your elbow pits towards each other.
Shoulder Elevation:
The first thing I want to talk about regarding shoulder positioning in the handstand is shoulder elevation.

Try to bring your head further AWAY from the ground.
Why is shoulder elevation important to handstands?
There are two reasons why, in my opinion, shoulder elevation is important:
1. It’s easy to flex your shoulders when elevating them, meaning it’s easier to get your arms in line with your upper body.
2. By elevating your shoulders, you are transferring more weight to your trapezius muscle, and unloading it from your joints. This is important for injury prevention as well as control, because when we use our muscles, we have much more control over our movements. If we rest on our joints, we are much more unstable.

The two reasons why shoulder elevation is important to handstands
As with all form cues, training for shoulder elevation is best introduced using the wall.
After entering a wall-assisted handstand, push into the ground to elevate your body, then let your body come back down. Repeat this for reps. Doing this exercise will help build strength in this position as well as increase your control while in the handstand.

A clip discussing these points, and how to practice shoulder elevation ‘for reps’
After you have become comfortable enough with the wall-assisted handstand to move on, you can try the same thing while doing a free-standing handstand.
As a side note, in my app there are several programs to bring you all the way from just learning how to be upside down, all the way to learning a One-Armed Handstand.

Shoulder Flexion/opening shoulders in a handstand
As mentioned at the beginning, shoulder flexion means getting your shoulders in line with your upper body. Another way to put it is to say you are ‘opening’ your shoulders.

In a way, learning shoulder flexion is the ‘bottleneck’ for handstand training. This is because learning any of the other form cues, from your shoulders down to your feet, is more or less useless if you are not able to flex your shoulders properly. What you do with your spine, and your hips will not be applicable to your handstand line, as the rest of your body will not be in line if your shoulders are not flexed.

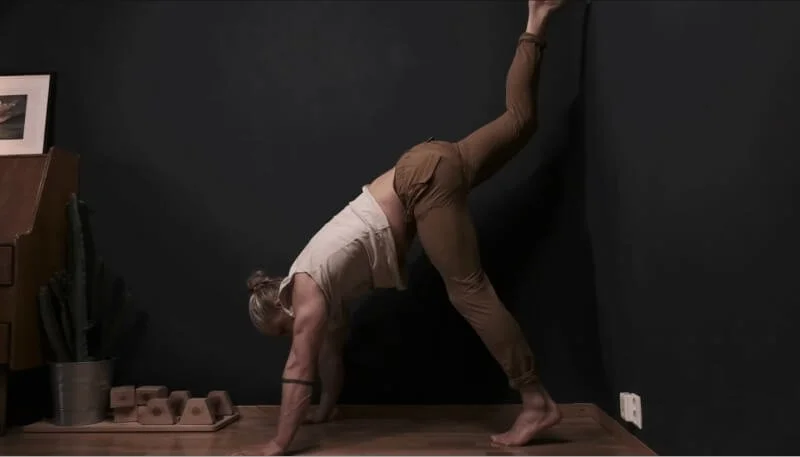
The elevated bridge. A helpful exercise in improving your spinal mobility as well as your shoulder flexibility.
So, learning proper shoulder flexion is key to creating a perfect line for your handstand. However, it will take time.

discussing shoulder flexion with some visuals that might be of help for you :)
The best way to achieve proper shoulder flexion is to work on your mobility using mobility exercises.

Some example of exercises which are helpful for better shoulder mobility.
While working on your shoulder mobility, you can continue to train your handstand balance. It’s perfectly okay to improve your handstand balance, even if your line is not good and you’ve got a big banana handstand, as you can re-integrate proper shoulder flexion later on when your shoulders are mobile enough.
Alternate leg downward facing dog: another helpful exercise for improving shoulder mobility/flexibility.
The best exercise for handstand relevant shoulder mobility:
Enter a wall assisted handstand with your chest facing away from the wall
Walk your hands further away from the wall
Push your hips down, and your chest out
Look at the floor between your hands, as you would in a regular handstand (keep the exercise relevant)

The best exercise for handstand relevant shoulder mobility.
This exercise will develop both shoulder mobility and flexibility, as well as - importantly - strength. Many people will use passive stretches to develop their shoulder flexibility and mobility, but then will not be able to employ that flexibility/mobility while in the handstand because they lack the strength to do so. Using this exercise will ensure you improve all three important factors for shoulder flexion while in the handstand: strength, flexibility, mobility. As a bonus, it will also improve your thoracic spine mobility.
Internal rotation of shoulders for handstands
If you want to achieve a super efficient handstand in terms of the corrections you do to balance, internal rotation is helpful.
In this video, I went over the importance and how to improve balancing on your hands. But to recap what I went over in that video, internal rotation of the shoulders means pointing your elbow pits towards each other. Doing this is especially helpful as an efficient correction for falling backwards in the handstand.

In these photos, pay attention to the shoulders.
Internal rotation of the shoulders will also help lock out the shoulder positioning while in the handstand. It tightens the upper back muscles and therefore keeps the shoulders in place properly.
Balancing internal rotation and external rotation will also be crucial down the road, if/when you are hoping to get started on the one-armed handstand.
How to Train These 3 handstand Form Cues
As with all form cue training, we start with the wall. Train your shoulder elevation, shoulder flexion, and internal rotation of the shoulders using the wall at first. When you’re comfortable enough, start training these form cues in a freestanding handstand.
For shoulder elevation and internal rotation, you can organize your training by doing ‘reps’ of each form cue. For example, if at first you are only able to do 2 shoulder elevation reps, you have a starting point and can aim to work up to, say, 6-8 reps.
That’s it for shoulder positioning form cues! Training these three aspects of shoulder positioning while in the handstand will help make your handstand more effective as well as more efficient, so you will do well to focus on them. I hope this shoulder positioning tutorial has helped and, as always, if you want a full, structured handstand program - along with many other programs such as a planche and back lever program - please feel free to check out my app.