90 Degree Handstand Push-up Tutorial - A step by step guide
The 90 degree handstand push up is a badass calisthenic skill, and also possibly the ultimate bodyweight pushing exercise. It is a natural step forward once you’ve mastered the handstand push up and are comfortable with that. However, you don’t actually need to have mastered the HSPU in order to start preparing for the 90 degree push up. One thing to keep in mind when comparing the HSPU to the 90 degree push-up is: while the handstand push-up requires pushing strength only in the vertical plane, the 90 degree push up requires additional strength in the horizontal plane - as well as technique for transitioning between the two. This certainly makes the 90 degree push up a level or twenty up from the handstand push up.

Check out the youtube video here :)
In fact, I would almost go so far as to say that I owe most of my pushing strength and physique to the training - including the more advanced training developments that come after - I’ve done to master the 90 degree push up.
The good news: training for the 90 degree push up is not like training for the planche, where going from one progression to the next can feel like a giant leap. Assuming you already have the handstand push-up mastered, I think you should be able to smoothly progress through the different stages of training for the 90 degree push up.
The bad news: well… there is no bad news really. It’s more like old news. As with all calisthenic skills, mastering the 90 degree push-up will require consistency; that you make a plan and follow it; focus; and effort.
The basics: What is it, what muscles do you use, where can you do it?
So, what exactly is a 90 degree push up? A 90 degree push up is a movement where you start in the handstand position, and go slowly down until you are in a completely horizontal position. From there, you return up to a handstand position. That is one complete 90 degree push up.
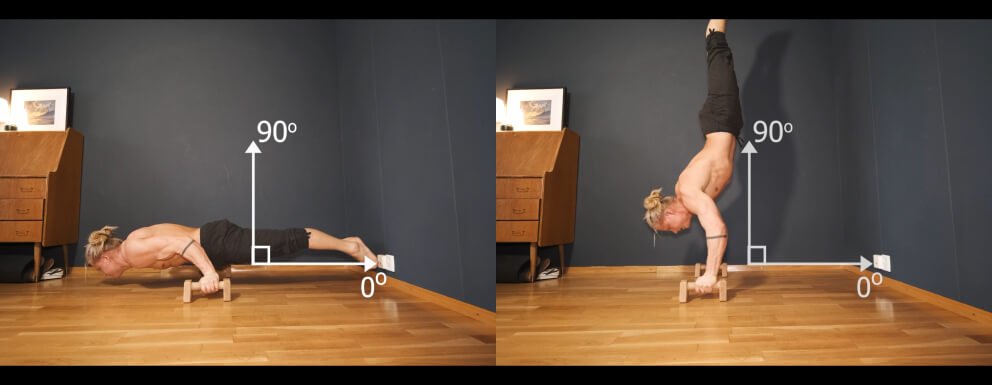
A visual of why this movement is called the 90 degree push-up. Within the movement we will be fully vertical as well as fully horizontal, moving our bodies 90 degrees.
In the first part of the move (the horizontal pushing part - lowest position), you will be recruiting all of your applicable strength from your pectoralis major (mostly the upper/clavicular part), as well as your front deltoids.

The muscles used going from the horizontal position of the 90 degree push-up.
In the second part of the move (the vertical pushing part - extending into a handstand), you will using your side delts, triceps, and trapezius muscles to much bigger extent.

Muscles used going from the horizontal position back to the vertical position.
You can perform the 90 degree push up on parallel bars as well as on the floor.
How to apprach and learn the 90 degree push-up step by step:
My recommendation for achieving this movement is to divide your training into two main parts. These are: developing strength in the vertical plane, and developing strength in the horizontal plane. Then what you’ll need to do is merge the two parts using technical drills, which we will go over below.
Horizontal Plane Approach fro the 90 degree push-up:
To build applicable strength in the horizontal plane towards the 90 degree push-up, we start with an all time classic: the push up!
Since you are here looking at a 90 degree push up tutorial, I imagine most of you are already quite comfortable with the push-up. So, to make it more difficult, we need to start to incorporate more and more of a forward lean into our push-ups. As well, we need to find a way to make how far we are leaning measurable. This is referred to as a psuedo planche push-up. The further the lean in the psuedo planche push-up, the harder.

Increaing the difficulty in the psuedo planche push-up. Look closely. Do you see a difference in how far back from the wall my hands are? The push-up position in photo number 2 is more difficult, and will help build your strength for the horizontal plane part of the 90 degree push-up.
To do this, we go back to our best friend, the wall. And, to measure how far we are leaning, we can use our hands and our fingers.

You can use your hands + fingers as a way to measure the distance you are away from the wall.
Side note : prepare yourself for some long names as we move on to the next few steps for building strength in the horizontal plane…
When you are strong enough, you should try to progress to the Half-Lay Bent Arm Planche position, which is most easily accessible/performed starting off in a knee-assisted position.
As soon as you are strong enough to hold the Half-Lay Bent Arm Planche position for a few seconds, you can start to do what I call Pseudo-Planche Levitation Push-Ups. The progression of movements for these levitation push ups starts off in the Open Half Lay position, then moves on to the straddle position, and ends in the Full Pseudo-Planche position. Take a look

Pseudo-planche levitation push-ups
Once you are able to do the Full Pseudo-Planche Levitation Push-Ups, you should be strong enough to do the 90 degree push-up, assuming you already have a very decent HSPU. You can, however, continue to build strength in the horizontal plane by going further, on to exercises such as:
The One Leg Assisted Tuck Planche Push-Up
Tuck Planche Push-ups
Band-assisted Open Half Lay Planche Push-ups
Band-assisted Straddle Planche Push Up
Open Half Lay Planche Push-Up (without band assistance)
Vertical Plane Approach - Deep handstand push-up
As mentioned, the strength you want to build towards having to be able to do a 90 degree push-up, is that strength needed to perform a deep handstand push-up.
Regarding the HSPU, I already have a tutorial as well as complete programs on my app. These programs will bring you from a complete beginner to an advanced level, and so can be a helpful tool to you no matter where you are in your training.

As mentioned in this clip, there is now a full 90 degree push-up program in my app. Check it out!
So, once you are able to do a HSPU, the focus should be on increasing its difficulty. This can be done by increasing the depth of your HSPU. To increase the depth of your push-up you can use platforms, as seen. You could also, for example, use two chairs - one for each hand - to allow for a deeper/increased range of motion for the HSPU. The eventual goal in terms of depth of the HSPU is to go all the way down until your chest is level with the surface your hands are on.

Using platforms will increase the difficulty of the HSPU. Getting a deeper HSPU will help prepare you for the 90 degree push-up.
Aside from your free-standing handstand push-up training, I definitely recommend you use the wall as well, both with your chest facing the wall as well as away from it.
Technique - bringing it all together to master the 90 degree pushup
The 90 degree push-up is indeed a very technical skill. I recommend you start training the technical aspects of it after you’ve built up the necessary strength in the horizontal and vertical planes. If you haven’t yet mastered the HSPU, you could instead consider training the technical aspects of the HSPU, rather than the 90 degree push-up.
Another thing I recommend is that you start your workouts with the technical drills we will go over below, as they are energy-intensive and will be hard to do at the end or in the middle of your training sessions.
Alright… let’s get into the technical drills for the 90 degree push-up:
1. Negative Roll Outs:
You can start these in the Half-Lay position, move on to the straddle position, and eventually the full 90 degree push-up position.

Check this clip out to see what negative roll-outs look like
Once you’ve started to get used to negative roll outs and have moved through each progression, you will want to try to stop at the bottom position.
You will still be doing these as negative reps, and also going through the movement starting with the half lay position, then straddle, then full. The starting position will be a full hand stand, and you will try to come down into a bent-arm planche position, and stop.. I.e. not let your body fall down onto the ground/ hold the bent-arm planche position.
After working through these progressions, we will have created awareness within the range of motion that the 90 degree push-up uses. However, we will have only worked on the easy part of the rep: going from a full hand-stand, down to the bent-arm planche position. Now, we need to worry about getting back up, i.e. the concentric phase of the movement.
2. Roll-ups!
No, to the North American readers, we’re not talking about your favorite childhood snack here. In this exercise you will start with your belly on the ground, and roll-upwards from the bottom to the top of your torso towards your chest, pushing into the ground with your hands and going into a handstand. Then we will lower ourselves down, as in the previous exercise. With the roll-ups, as has been the theme for this entire tutorial, you will progress through this exercise using the following positions, in order:
Half-lay
Straddle
Closed leg half-lay position
Full position

Roll-ups. Using momentum, you will roll up into a full handstand, then let yourself down in a controlled manner
Eccentric, slow controlled, rolling up and using momentum going up again. Build up repetitions within each progression. Jumping from one progression may not be as much of a leap as you think… more about gaining awareness and learning to use the right muscles.
3. 90 degree push-up:
Once you’ve become comfortable with both the negative roll-outs and the concentric roll-ups and worked through the progressive positions in each, it it time to start working on the unassisted 90 degree push-up. Again, you will start with the Half-Lay position and build up to the full position.

The full 90 degree push-up and the things you can work on after it!
How to learn the 90 degree handstand push-up - SUMMARY:
There you have it! The 90 degree push-up, and how to attack it:
Gain strength in the horizontal plane through pseudo planche push-ups and 90 degree holds/bent arm planche.
Gain strength in the vertical plane by going deeper in you handstand push-up training.
Negative(eccentric) 90 degree push-ups: roll-outs in half-lay, then straddle, then closed leg half-lay, then full position.
Concentric 90 degree push-up with dynamic assistance: roll-ups in half-lay, then straddle, then closed lay half-lay, then full position.
Practicing the concentric and eccentric phase with lever assistance through the standard progressions: open half-lay, then straddle, then closed lay half-lay, then full position 90 degree push-up.
Give yourself a high five - you are now one of the few in the world who can perform the 90 degree push-up! … and you got insanely strong on your journey to reach it.
The full 90 degree push-up doesn’t have to be the end of the road for this movement if you don’t want it to be. You can move on, for example, to trying them with supinated grips, on rings, and going deeper. If you’re set on being an absolute animal, there are many ways you can continue to make this movement even more difficult.For now, though, I hope this tutorial has been thorough and clear enough to help bring you closer to mastering this cool movement. If you’d like to go over it again you can refer back to this piece whenever you like, or you can check out the youtube video here. Feel free to leave any questions or comments here or on youtube and I will do my best to get back to it. Take care movers!