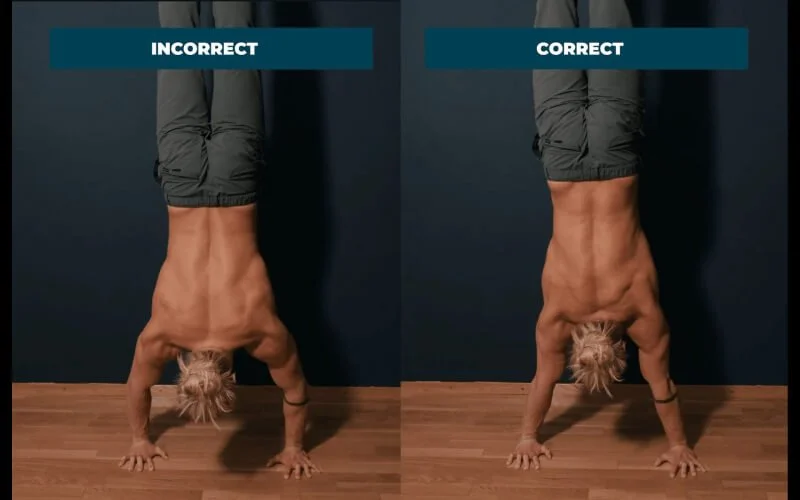
Handstand: The Most Important Form Cues
Grip the ground, straighten your elbows, tuck in your head, flex your shoulders, elevate your shoulders, internally rotate shoulders, hollow out your body, posteriorly tilt your pelvis, tighten your glutes and legs, straighten your knees and point your toes. If you feel like forgetting the handstand is even a thing after reading all that, I understand. When it comes to the handstand, it can be overwhelming to try and apply everything we’re supposed to do to perform it correctly. In this article, I am going to give my take on what I think you should prioritize when learning the handstand. The handstand is a beast to take on and, in this article, I hope to simplify what you should be focusing on when learning it.
Check out the full video tutorial on what handstand form cues to prioritize.
In addition to the fact that it’s impossible to keep the dozen or so above-mentioned form cues in mind when trying to handstand, at the beginning of your journey you may not even be flexible enough, mobile enough, or strong enough to be able to perform them. There is no point in trying to force your body into positions that it physically can’t hold yet.
Some aspects of your handstand are better approached on their own, separately, and can then be integrated into your handstand later. For example, to go from a non-flexed handstand, to a flexed handstand, may require months of practicing a chair-elevated thoracic bridge. See picture below.
The point of this article is to prioritize the most important form cues. To do this, I have created 5 levels of priority.
In this article I’ll be mostly addressing priority level 2. Check this piece out for priority level 1: Complete Beginner’s Guide to the Handstand
Priority Level 2: From the Shoulders Down to Your Hands
From shoulders down (from the perspective of being in a handstand, i.e. from your shoulders down to your fingers) is priority level 2, and that is what we will be focusing on most in this article. The section from the shoulders down to your fingers is the most important section in creating balance and efficiency.
Priority Level 2: Shoulders to Hands
Priority Level 3: Shoulder area
As well, we will talk a little bit about priority level 3. Priority level 3 is the form cues relating to the shoulder area, for example shoulder flexion and shoulder elevation.
Priority Level 3: Shoulders
Priority Level 4: Hips to Shoulders
Priority level 4 is from hips to shoulders. This section is not that important for balance, but it is moderately important for efficiency, and it is important for getting that pretty straight line :).
Priority level 4: Hips to Shoulders
Priority Level 5: Toes to Hips
Priority level 5 is from toes to hips. It is slightly important for efficiency, and it is important for achieving a straight line.
Priority Level 5
For each of these sections/priority levels, the further down towards the ground (while in the handstand)we go, the more important it is for the handstand.
Kudos to you if you noticed there has been something missing thus far… priority 1! Priority 1, the most important of all, is this: getting strong enough; getting comfortable upside down(developing wall-assisted handstand), and developing awareness/learning to fall. I’ve already made a tutorial for these and you can check that out here if you’d like.
Back to priority level 2, the section from our shoulders down to our hands.
Believe it or not, the most important part of being able to do a handstand, is our hands! What I mean by that is, we need to learn how to use our hands to manipulate our body position while upside down.
Tried and True Handstand Training Program
Let me quickly interrupt your reading. By far the most important thing to truly achieve a handstand, is having an awesome coach to guide you ;). I’ve got 3 dedicated handstand programs on my app, where each day’s exercise session is already set up for you. Practical tips, doing the right exercises, and consistency will get you there. If you follow the program and put in the time, achieving a handstand is inevitable.
Here is what you need to keep in mind regarding your hands when working on your handstand(note,I would recommend practicing against the wall until these form cues come instinctively):
Fingers should be spread out
Try to grip the ground
Fingers pointing forward
Learning to push with either our fingers or our hand heel to move our body in either direction
Regarding point number 4, this is probably the most important thing to keep in mind in learning to stay on your hands for longer and longer. We need to learn to adjust our body by either pushing in with our fingers, or pushing in with our hand heel, to adjust and correct our body position.
For example, if your chest is to the wall when doing a wall-assisted handstand, you would push in with your fingers to bring your legs/feet to the wall, and you would push in with your hand heel to bring your feet away from the wall. Applying this to a wall-assisted handstand with your back facing the wall, you would push in with fingers to bring your feet away from the wall, and push in with your hand heel to bring your feet to the wall.
Really focus on learning to use your hands to balance and adjust your body position.
Moving up to the elbows. When performing a handstand, it is important that your elbows are straight. Having flexed elbows is incorrect and would also be very tiring strength-wise. If you are unable to straighten your elbows when doing the handstand, it is possible that the culprit is in fact your shoulders and an inability to elevate/flex them.
Next is our head positioning. Regarding your head positioning, what I recommend is that you get used to always looking between your hands. Whatever exercise or drill you are doing, look between your hands.
Not in front.
Not behind.
Not backwards. (props if you can hold a handstand while doing this though)
Between your hands! Always!
Where exactly between your hands should you look? Try picturing a line that goes between each of your thumbs. In the middle of this line is where you should look.
Regarding shoulder positioning, the most important thing you can think about is pushing away from the floor. When in the handstand position, try to push your head as far away from the floor as possible. This is called elevating your shoulders, and will achieve the desired shoulder position for a correct handstand.
Another thing to keep in mind regarding your shoulders is to flex them. But, trying to flex your shoulders when you’re physically incapable of it will only cause frustration. It may take a long time to develop the mobility and strength required to flex your shoulders, so my suggestion is to work on your shoulder mobility on the side. Don’t stress about achieving a straight line by flexing your shoulders enough, because it may take some time.
To work on your shoulder mobility, you can use drills such as:
Dislocations
Chair bends
Wall back bends
Include these into your handstand workouts as a supplementary exercise. If you’re interested, I’ve got an upper mobility follow-along routine on youtube, as well as two upper body mobility workouts in my app. You can try it out for free.
To summarize, here are the form cues, among the many, that I think you should focus on more when starting out:
How to Handstand - Most Important Form Cues for Beginners
Use your hands (pushing in with fingers/pushing in with hand heel)
Straighten your elbows
Look down between hands
Elevate your shoulders
Remember not to try and focus on all of these things at once. Focus on the most important parts first. Introduce things one at a time and then try to bring them together later.
For an absolute beginner’s guide to the handstand you can check this article out, or you can check out The 10 Most Common Beginner Handstand Mistakes.
Hope this helps simplify things a bit for you regarding what to focus on and what’s important when learning the handstand. If you’ve got any questions, hit me up here, on YT, or at my IG. Thanks and take care movers!
As you can see from these photos, I’ve got 3 dedicated handstand programs on my app, where each day’s exercise session is already set up for you(photo 2). All you’ve gotta do is open it up, click that day’s workout, and the list of exercises for you to do is there. Each exercise can be clicked for form cues and videos on how to perform them.


