Tuck Planche - 7 form cues and 4 adjustable exercise drills
Wanna add some more tricks to your bag? The Tuck Planche may look easy, but it’s pretty damn hard. It is a necessary milestone on your way to learning the full planche, but it’s also okay for the Tuck Planche itself to be the end goal.

Check the full youtube tuck planche tutorial here :)
You will build loads of strength as well as scapular awareness in learning the Tuck Planche, and that can be applied to other skills such as the Press to Handstand. So, in learning the Tuck Planche, you don’t need to be distracted by the worry of going onto the Full Planche, as the Tuck Planche will add tools to your belt that can be used in a completely separate area from the Full Planche. In this Tuck Planche tutorial I will teach you
practical tips, or form cues on how to perform the tuck planche
What muscles to tighten in planche in general
What to do and think about while you are doing the tuck planche movement
I will also teach you technical drills that will help you learn the Tuck Planche faster, as well as strength drills that will help you develop the relevant strength for this skill.
Tuck Planche Form Cues
Diving straight in: there are a few form cues you should think about when doing any of the following drills. These form cues are important because:
They will help you perform the movement correctly
They make the movement easier
They will help prevent injury
1. Hand Positioning for planche training
The first form cue I’m going to cover is about hand positioning. I recommend twisting your hands about 45 degrees outwards when performing the Tuck Planche. This will still give you good leverage to push with your fingers, but it won’t require you to bend your wrist at the same angle as you would need to if your fingers were facing straight.

Placing your hands down at 45 degrees will keep strong leverage in your hands but allow for a softer angle on the wrists when training any planche progression.
2. Straighten Your Elbows
Another important part of the Tuck Planche is to straighten your elbows. In order to help straighten your elbows correctly, think to yourself that you are trying to tighten your tricep. This will make it easier.
3. Shoulder Positioning for planche
The first thing we need to think about regarding our shoulders, is protracting them, meaning we want to push our shoulders forward. Imagine tightening your chest muscles and squeezing shoulders towards each other in front of your body and this will help stabilize the position.

Check the clip out to get a visual on what position your shoulders should be in going into the tuck planche
Secondly, your shoulders should be depressed, meaning they should be pushed down. Think about trying to bring your fingertips down towards the ground while sitting or standing, and this is depressing your shoulders. Depressing your shoulders will reduce the distance between your shoulders and your center of gravity, making the tuck planche easier. As well, it stabilizes the shoulder position.

Protract and depress your shoulders when doing the Tuck Planche
4.Rounding out your back will make the tuck planche (and other planche priogressions) easier
One more thing to keep in mind is, while you’re in the tuck planche, to push out/round out your upper. This will make your upper body shorter, thus decreasing the distance between your center of gravity and your shoulders, making the tuck planche easier. This also makes activating your spine extensors easier, which we will go over more later.
Dedicated Tuck Planche Program & Workouts
In my app the Movement Trybe, I’ve got a full program dedicated to learning the Tuck Planche, called Planche 1. It contains workouts aimed at learning the tuck planche structured into weekly scheduals and with an abundance of tuck planche progressions and drills to always keep you progressing. So, if you’re interested in following a structured program that will help you achieve the Tuck Planche, you can check that out :).
5. Tuck your knees tightly in
Tuck your knees as close to your chest as possible while in the tuck planche. This will again make it considerably easier.
Bringing all the tuck planche form cues together:
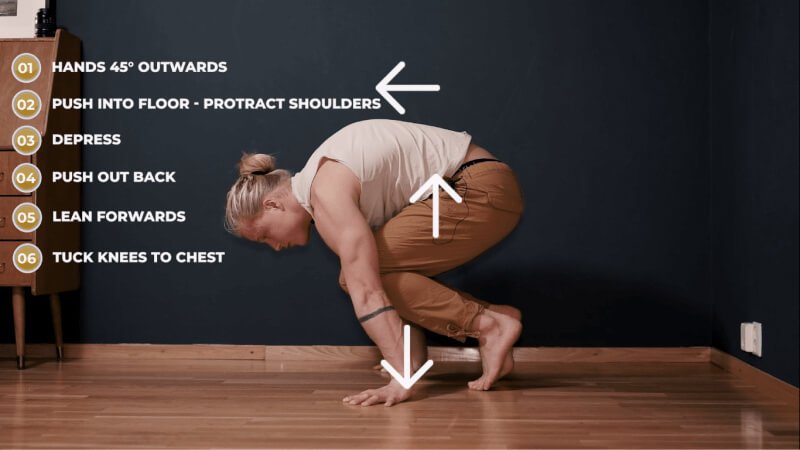
So, start in a deep squat position on your toes, and then:
Put your hands on the floor at 45 degrees
push into the floor as hard as you can(protract shoulders)
Depress shoulders
Flex triceps to keep elbows straight
Push out back
Lean forwards
Tuck knees to chest
By doing this you will activate all of the muscles needed to perform the tuck planche correctly. And, when you get strong enough, you will be able to lean forwards enough after doing step 7 to bring your toes off the ground and enter the tuck planche.
But! This could take awhile. So let’s go over some drills to work on the technique and strength involved in this skill.
Technical Tuck Planche Progressions & Drills
Crow Stand
The crow stand is a great exercise to get used to keeping balance while being in a position similar to the Tuck Planche. Maintaining balance in the Tuck Planche is easier then, for example, keeping balance while in a handstand, but there will still be an adjustment period in getting used to the balance of the position with the Tuck Planche. The Crow Stand is a good exercise for training this balance.
Here is what the crow stand looks like:

The crow stand is a great exercise to start training your tuck planche balance
Because your elbows are bent in the Crow Stand, it is easier strength-wise than the Tuck Planche. When you are first learning the Crow Stand, when you lean forward you may keep your toes on the ground. Then, you can try to use only one foot, an eventually have both feet come off the ground. Squeezing your hands into the ground will help you gain control while in the position.
As you get used to the crow stand, you can begin to try to straighten your elbows. Placing your knees on your arm will de-load the weight placed on your shoulders and triceps significantly, and will make it easier to do. As you get stronger, you can try to bring your knees above your elbows, and you will be in a sort of hybrid Crow Stand/Tuck Planche. This hybrid requires considerably less strength than the full Tuck Planche, but is a great way to practice the technique of the Tuck Planche.

You may not notice the difference at first - as opposed to the knees being all the way over the tricep and bent arms, we here have straight arms with the knees placed on the lower tricep.
Tuck Negatives
Once you’ve more or less mastered the Crow Stand/Tuck Planche hybrid, or straight arm Crow Stand, you can begin to think about training the full Tuck Planche. Another exercise and great intermediate step that will bring you even closer to this is Tuck Negatives. With Tuck Negatives, you will place your hands down at 45 degrees as mentioned before, straighten your arms, and stick your butt up high in the air. Then, lift your feet up so you are in a full Tuck Planche, and try to slowly let yourself back down to the ground.

Doing tuck negatives for reps is a good way to build strength for the full tuck planche
You can repeat these Tuck Negatives for repetitions, and continue to build Tuck Planche strength :). The goal is to eventually be able to hold the Tuck Planche statically, but this may take awhile.
Strength progressions & Drills for Tuck Planche
Pike Planche Press
One of my favorite planche strength skills/drills is the Pike Planche Press. To do it, you start in a pike position, and then you lean forward, straightening your hips completely, and then push back up again. If this feels too easy at first, try moving your hands closer to your feet. This will make it more difficult.
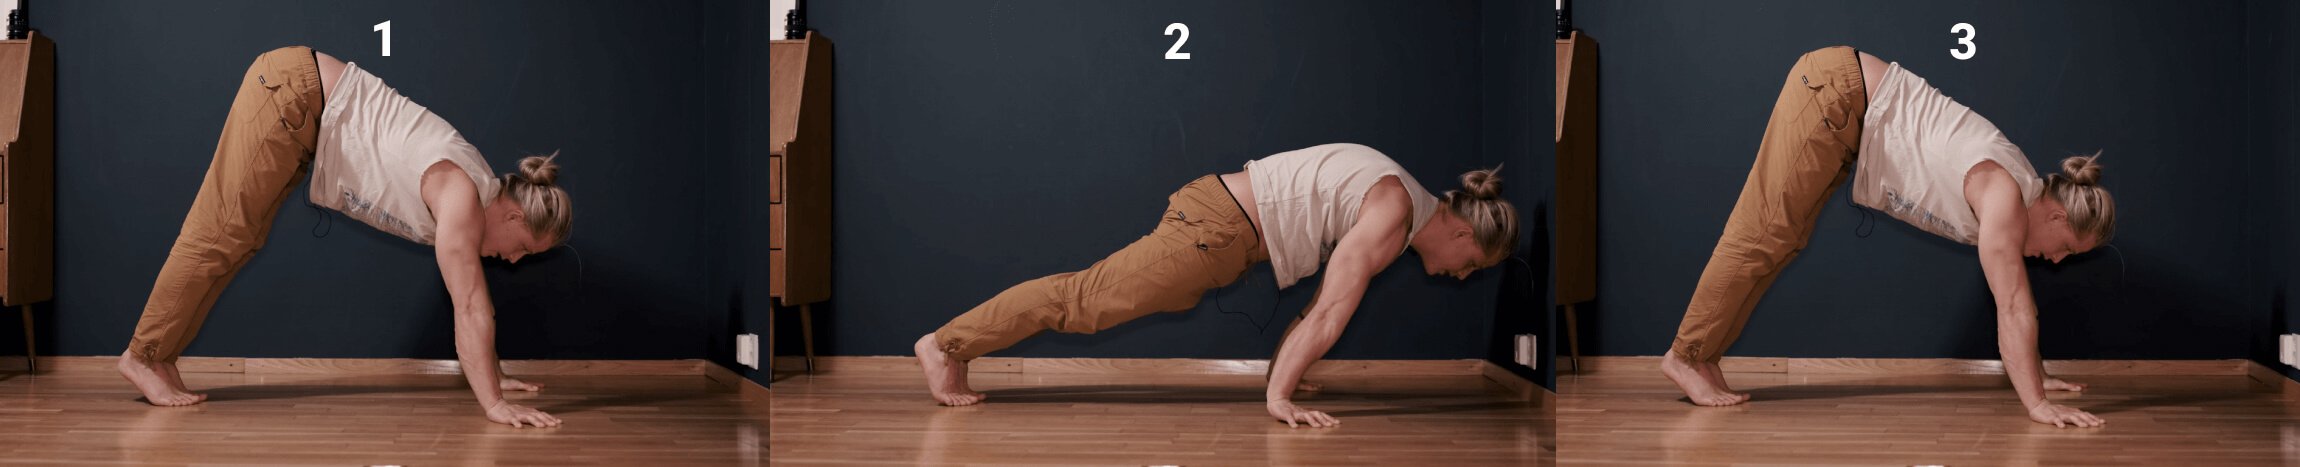
Pike Planche Presses
One important thing to note when training strength, is that we want to improve it, right? Seems overly obvious, but applying this knowledge is important. Keep track of your progress, ie how many reps of the Pike Planche Press you are able to do.
Another thing that would be helpful to measure is how far forward you are able to lean when doing the pike planche press. In this case, just like with the handstand, the wall is your best friend. You can use the wall as a reference point to see how far away you are able to go from it, then lean forward into a Planche Lean and bring your head to the wall.
You’ll need a consistent way to measure your distance from the wall and, if you don’t carry a measuring tape around in your back pocket, you can use your hands to do this. For example, the first week you can try the Planche Lean with your hands placed on the ground “3 hands” away from the wall. The next week, you can try 3 hands + 1 finger distance away from the wall.

Keep track of and focus on improving your progress
When doing these Pike Planche Press Leans, it’s important to keep in mind the form cues we went over before, such as flexing the tricep to keep the elbow straight, spine position, shoulders depressed and protracted, etc.
Using Resistance Band for Planche training
Using a resistance band is also a great way of training the Tuck Planche, and I will go over how exactly you can use it in a full dedicated article and video.

Very soon I will be b posting a video and an article on how to use resistance bands for training the planche. Keep an eye out for it :)
Core strength for planche
The planche requires a lot of core strength - not necessarily in your abs, but more so in your spine extensors. If you want some more progressions to try after you’ve got the Tuck Planche, as well as for some ideas on how to build your core strength, you can check out the Full Planche tutorial I’ve got on Youtube :).
Hope this all helped, if it did let me know! Happy to hear any comments, criticisms or questions you might have as well. Take Care movers!
Leave a comment below :)
Share Post!