Handstand guide for Complete Beginners - 3 steps
If you are trying to learn how to do a handstand from the very beginning, there are already many tutorials and videos available online. The title for a given video might say “Beginner Handstand Tutorial”, but many that I’ve seen assume you’ve already gone through some steps that you may not have yet gone through.
Particularly, many assume that the wall assisted handstand is the first step, but this is far from the truth. Becoming comfortable upside down, in a handstand position by conditioning your fear of falling; building up to the required strength; and developing awareness of your body in terms of your spine, your pelvis, your legs, and your overall stability - these are the foundational building blocks to getting started on your handstand.
“Anyone can learn to handstand.. It might just take a bit longer for some”
Remember that in learning the handstand, the handstand itself is actually not the beginning of the journey. Becoming acquainted with the wall in a stepwise manner (literally step wise as you will see!), and learning to headstand, and to fall from a handstand, in fact, is where the journey begins. In this complete beginner’s guide to handstand, I will address these fundamental aspects that, once worked on, will have you much closer to a handstand. We will be approaching the handstand from scratch. Let’s dive into it!

Check out the full Youtube tutorial to get started learning handstand
Step 1: How to fall from a handstand - the easy way
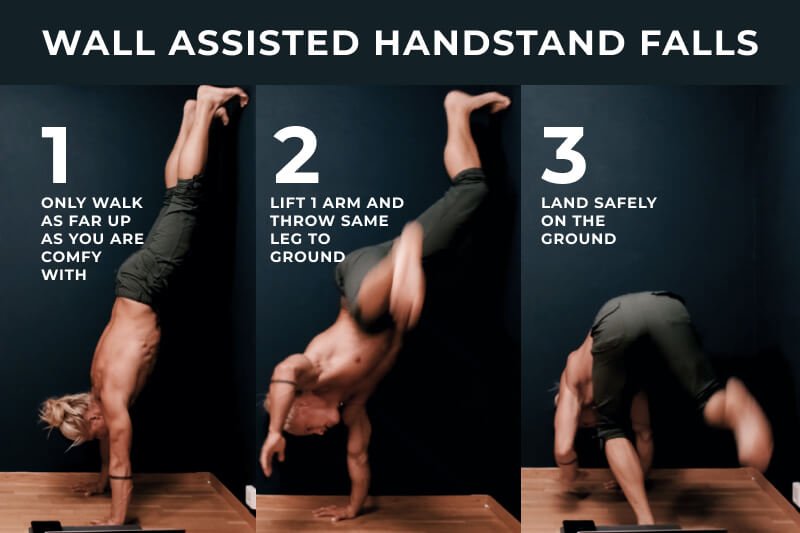
The very first step you should take when learning to handstand, is learning to fall! Through exposure therapy - that is, falling again and again - you will get more comfortable being upside down, and less fearful of falling. Falling is a skill, and one that should be practiced. The technique that I like to use in my own training and with my students is called the Wheel Out. The Wheel Out is a technique taken from the cartwheel, and you can picture it as sort of the very end/second half portion of a cartwheel. To do it, you keep one hand planted on the ground and lift the other, turn your body and let your foot fall to the ground.
To practice the Wheel Out, start from the ground and go further and further up on the wall, until you are comfortable performing the wheel out from a full wall assisted handstand.
Learning to fall from handstand is an important step in getting comfortable with handstand and getting rid of that handstand fear.
It is important to get skilled at falling in a stepwise fashion, because again, falling is a skill, and it’s something that you need to automate over time. You can practice by getting into the slight incline handstand position, then kicking your leg forward slightly to bring yourself off balance. As you get more comfortable and are able to do the Wheel Out from further and further up the wall, and thus from an increasingly vertical position, you may want to try walking your hand forward one step while wheeling out. This will add more control to your Wheel Out.
It could also be helpful to add soft surfaces around you when you are practicing the Wheel Out. Note that it is not recommended to place your hands on the soft surfaces themselves. For example, having a mattress in the area that you intend to fall is good, but putting your hands on the mattress itself while you work into a wall-assisted handstand is not recommended. This will lead to more wrist pain than you might already be feeling.

Falling from handstand is one of the most essential parts of learning the handstand. In the beginning, start by only walking a little bit up the wall
Eventually you can try to kick up into a very brief handstand, and allow yourself to fall, using your Wheel Out to fall out of the handstand safely. Actually focusing on balancing your handstand will come at a later stage, but it is important to be comfortable with the Wheel Out before that point.
Practicing cartwheels themselves are something that could help train your wheel out as well. If you’d like me to make a tutorial on cartwheels, please let me know by leaving a comment below in this blog, or on the YouTube video. I almost always get back to these comments, so do know I will really take your request into consideration.
Step 2: Handstand strength - getting strong enough
To do a handstand you must possess the strength to hold your bodyweight on your hands. To build up to the required strength, I recommend a simple drill that you should practice as much as you can and whenever you have time.

Start in a push up position; walk your hands toward the wall and your feet up the wall, then back down. That's one rep! The goal is to get into a handstand position, but take your time, it can take a few weeks/months to get to this level.
To do this drill, you start in a push up position, and start walking up the wall with your feet. Step with your hands and feet, and go as far up the wall as we are comfortable with. Once you’ve walked your feet up the wall, and your hands closer and closer to the wall, walk your feet back down the wall. That is one rep. In the beginning, simply talking one step up the wall and going back again may suffice, but you should always try to challenge yourself by walking as far up as you are comfortable with. Repeat this again for a second rep, and a third, and a fourth. Continue this exercise until you are fatigued - until your muscles are fatigued, and you feel like you can’t do it anymore. When you’re fatigued, walk your feet down the wall, and take a rest. Rest, stretch, then try this again for 2,3 or even 4 sets. This will be more than enough to progressively build the required strength for doing a handstand, if you are able to train the drill two to three times a week.

Wall walks is the easiest and most effective way of building handstand strength. Only walk as far up as you are comfortable with and every training try to push yourself a little further.
Every time you’re doing this drill, do as many repetitions as you can, and go as far up the wall as you can. This drill will help to develop your strength, as well as your awareness while being in the upside down position.

Fully designed handstand programs
Before diving into the third step of learning to do the handstand, I want you to consider how serious you are about actually learning and executing a handstand. Is this a fleeting feeling of motivation, or are you serious about this? If you take your goal of accomplishing a handstand seriously, and are prepared to do all the work - but aren’t sure what all the work actually is - then my app is for you. It’s got programs fully designed, from beginner to expert level, to help you along on your handstand journey. Check out the reviews, try one week free, and see if it’s for you :)
Step 3: Learning to headstand - Developing awareness
The third important step towards achieving the handstand is developing awareness, and this can be practiced at the same time as practicing your handstand strength and fall as prescribed above. That is, you need to be able to manipulate your body while in the upside-down position. The best way to do this is to practice the headstand!

Training your headstand will play a crucial role in developing positional awareness. This will carry over and significantly improve your handstand down the line!
Practicing the headstand will help many aspects of your handstand. You can learn to keep your body stable while upside down; you can become more aware of your spine; you can become aware of how your hips are placed; and you can start to get used to tightening your legs and moving your legs while upside down.
If you haven’t done a headstand before, start by practicing near the wall. You need to create a stable triangle between your hands and your head. Start with your head near the wall, tuck your knees and walk them up to your chest, until your feet start to lift off the ground. As you walk your knees into your chest, try to get your hips up over your head.
It’s important not to rush into trying to get your legs up. Keep your movements slow and with intention. When you’re able to comfortably walk your knees into your chest and have your toes lift off the ground slightly, you are ready for the next stage.

The very first step to performing the headstand - toe assisted tuck headstand
In the next stage, after walking your knees up to your chest, you need to lift your feet up and tuck them up to your glutes. From this stage you can try to extend your hips, creating a 90 degree angle between your body and your thighs. Next, you can continue to extend your hips, so that your heels are almost directly above your hips. Finally, you can extend your knees and hips completely, for the full headstand.
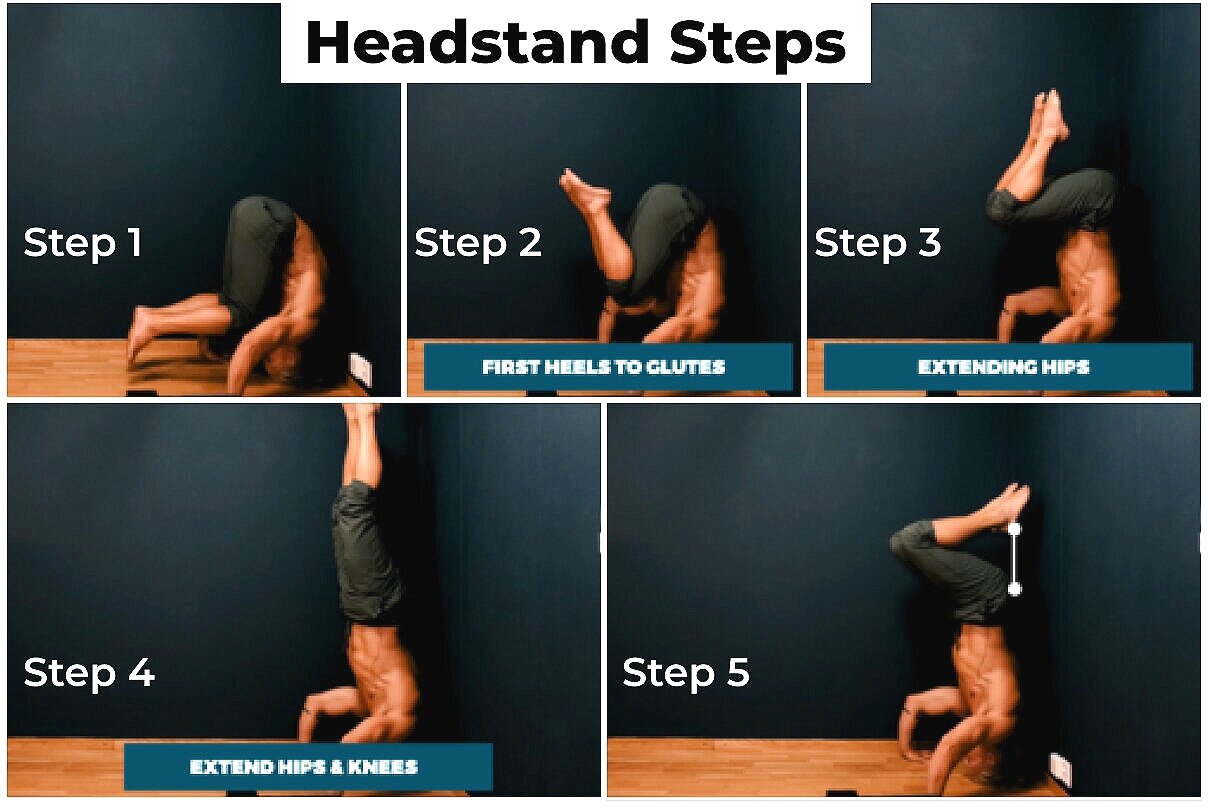
These are the basic steps to learn the headstand. Remember that you start with step one and wok on it until you feel comfortable. This may take more than one day, perhaps even weeks. The you move on to step 2 and so on - and suddenly you learned how to headstand :)
Training your headstand near the wall means you don’t need to be fearful of falling, and can focus fully on performing the headstand as well as possible. One thing you might want to do is place a yoga mat or some sort of padding where you will place your head, as putting your head directly on the ground may hurt a little.

Using padding, such as a folded up yoga mat, will allow you to spend more time training your headstand and not feel pain on the top of your head.
As you become more and more comfortable with the headstand, you can start to experiment with moving your legs around while in the headstand position. For example, you can work on the straddle, tucked, or pike headstand, as well as the full headstand. Then you can move on to tuck ups. moving in and out of the straddle position from a full headstand, and even doing the splits with your legs while in the headstand position. Experiment with hip placement and feel how it affects your body alignment. If you’re able to video-record yourself while experimenting with different positions to connect what you are feeling when you hold a certain position, to how it actually looks, even better.

Tuck Ups are a good way to train your body to be stable while upside down.
Regardless of whether someone is already strong enough to be in the handstand position, I would still recommend they use the headstand in their training. The headstand is where we are more easily able to introduce different leg positions and get a feel for our body position. Once we’ve gained the positional awareness through training with the headstand, we are able to transfer that to the handstand.

When you’ve become comfortable on your head, you can start to experiment with different shapes. Check it out here :)
If you read through all of this and found it helpful, but still would like that extra help - an exact path to follow - then for sure my app will be of invaluable use to you. In it, there are three full handstand programs, of increasing difficulty, with entire workout sessions in each. The programs are designed to last 5 weeks and each day is planned for you. Specific exercises, sets, and reps are already laid out for you. Each exercise within a session has video description as well as form cues, leaving no guesswork. If you are truly committed to learning the handstand - and that’s what you will need to be to actually be doing one in any reasonable amount of time - then getting started on one of these programs is for you.
Let’s summarise the content of this beginner handstand tutorial real quick:
How to handstand for complete beginners:
How to fall from a handstand - the easy way
Falling is a skill, and one that should be practiced. The technique that I like to use in my own training and with my students is called the Wheel Out.
To do it, you keep one hand planted on the ground and lift the other, turn your body and let your foot fall to the ground.
To practice the Wheel Out, start from the ground and go further and further up on the wall, until you are comfortable performing the wheel out from a full wall assisted handstand.
Handstand strength - getting strong enough
start in a push up position, and start walking up the wall with your feet. Step with your hands and feet, and go as far up the wall as we are comfortable with. Once you’ve walked your feet up the wall, and your hands closer and closer to the wall, walk your feet back down the wall. That is one rep. In the beginning, simply talking one step up the wall and going back again may suffice, but you should always try to challenge yourself by walking as far up as you are comfortable with
Learning to headstand - Developing awareness
If you haven’t done a headstand before, start by practicing near the wall. You need to create a stable triangle between your hands and your head. Start with your head near the wall, tuck your knees and walk them up to your chest, until your feet start to lift off the ground. As you walk your knees into your chest, try to get your hips up over your head.
Happy handstanding movers!