5 Common One Arm Handstand Mistakes... and how to fix them
First of all, if you’re reading this, congratulations on striving to achieve the challenging movement that is the one arm handstand(OAHS). Whether you’ve come here because you would like to get started down the path of achieving a one arm handstand, or have been working towards it for awhile already, I hope this article will help you get further down that path. If you’ve already gotten started on your training towards a OAHS, you might have already come to realize that it is indeed a journey - not a quick one - and perhaps that is the first thing you will need to embrace about this movement.
Beyond the obvious - building up to the required strength and balance to be able to perform the one arm handstand (OAHS) - there are certain things I think will be helpful to keep in mind for anyone training towards their one arm handstand(OAHS). In particular, in this article I will go over the 5 mistakes I see people making most often. I believe that, if you are able to keep these common mistakes in mind and gain control over them, your training will be made more efficient and effective. Let’s dive into it.

Watch the Full YouTube tutorial of the One arm handstand
1. Ego training the one arm handstand (overconfidence/skipping steps)
Every now and then, as a part of your training, I think it’s great to just go for it - to try something that you know is at a higher level than where you’re at. Sometimes we will surprise ourselves or get a taste of something awesome and exciting. But, consistently training that way does not build a solid foundation, and will not work out in the long run. Be aware of where exactly you are in your training, and gain confidence in that first. Once you’ve mastered your current state of progression, know what the next progression should be, and then make sure you are confident with that progression. Take it step by step.
Please note that before you are even getting started on the OAHS progressions you need to have your regular handstand completely locked down. You should be able to hold your handstand for at least 60 seconds or more. You also need to be able to hold it in several positions, particularly in the tuck position and, even more importantly, in the straddle position. Then, you can begin to move through your one arm handstand progressions. I’d recommend being comfortable in any given progression for at least around 10 seconds before moving on to the next progression. For example, try a handstand with one hand planted and your second hand on five fingertips, then two fingertips, then one. Before moving on from five fingertips to two, make sure you’re able to hold the position for 10 seconds. Remember that you can head to my app anytime, where I’ve made step by step tutorials detailing all of the progressions you need to know to reach the one arm handstand. The thing to keep in mind here, is to actually go through each of those progressions. Don’t skip steps :)

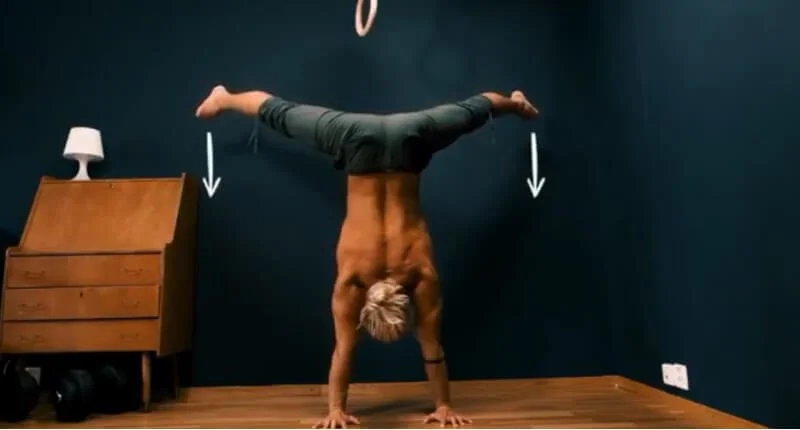
Straight arm fingertip supported vs fingertip supported OAHS
2. Not using the wall for one arm handstand training

The wall will serve as one of the most reliable and consistent training tools throughout your entire hand balancing journey, from beginner to expert level.
The wall is your friend. Use it! No matter where you are in your training, the wall is an invaluable tool in helping you progress towards a beautiful one arm handstand (OAHS). Please keep in mind that, whereas with handstand push ups(HSPU) it is advisable to use the wall with your back facing away from the wall as well as toward the wall, with OAHS you will only use the wall to assist you with your back facing away from the wall/chest facing the wall.

The wall is an invaluable tool for your journey. Pair wall-assisted holds and entries with free standing holds and entries.
Using a wall in your training is helpful in so many ways. For example, it can help you see and feel where your one arm handstand needs adjusting. Two things I often see which cause people to come out of their one arm handstand are over rotation of the hips, and over rotation of the shoulders. Using the wall allows you to feel these things happening more, and then you can focus on preventing them from happening in the first place.
Another important thing about using the wall is it gives you the space to think through all the little things. Without the wall, our main focus is just this : “don’t fall, don’t fall, don’t fall.” With the wall, we’re able to spread our focus out a bit more to the different aspects of our one arm handstand and notice the smaller details of our position. For example: relaxing your elbow(don’t tighten triceps, but let elbow be loose and mobile); elevation(make yourself tall by pushing the floor away); internal shoulder rotation(think elbow facing head); anterior pelvic tilt(straightening legs out and bringing feet towards floor to straighten and lock legs in position...only in straddle position).
Without the wall, we don’t have the time or space to focus on each of these things individually. With the wall, we do. With the wall, we are able to focus on and master all of these. After improving on these details, we can then bring them together for a better one arm handstand, without the wall.

Fully designed One-Armed Handstand programs
If you are reading an article about a One Armed Handstand, it is already a given that you take your training seriously. The content of this article is not applicable to most people out there, because most haven’t made it here yet Still, another perspective, even for someone who is already at a high level, can bring progress. My app is something that might bring that fresh new perspective or some new ideas into your training. You can try it for free for a week. Give it a shot :)
3. Training one arm handstand before ready
As stated above, you need to have a super solid handstand before attempting to train your OAHS. And by that, I mean solid in many variations of the handstand. You should have total control of your shoulder position; you should have total control of your leg position. You should be able to move your legs around while in a handstand position. You should be able to do tuck handstands, and you should have a straddle handstand locked down. Lastly, you should be strong enough to be able to elevate your shoulder position and hold it there, while in a one arm handstand position.

Tuck handstand and other shapes are very useful to gain control over your lower body when hand balancing

Straddle handstand is especially important for one arm handstands.
4. Thinking the full position is easier than the straddle one arm handstand

It is a common misconception that the full OAHS is easier than the straddle OAHS. This is simply not true in my opinion, check the clip out to see why.
As you make your way through your progressions towards the one arm handstand, you may feel that somehow it is easier to do the full one arm handstand than the straddle OAHS. This is not true, and training that progression - the full one arm handstand - before you have mastered the straddle OAHS, and before that the straddle handstand, will slow your overall OAHS progression.

Full one arm handstand

Straddle one arm handstand
It is very important to first get super comfortable with the straddle handstand, and later the straddle one arm handstand, before moving on to the full one arm handstand. Your straddle position should be tight, with your legs out as far as they are able to be, and they should not be wobbly. Keep in mind, you don’t need to be able to do the splits for a perfect straddle position - I cannot do them myself. If, like many, you are not very flexible, you will have a slight pike in your position. This means you will have a slight over flexion in your shoulders, and you will need to tilt your pelvis over your shoulders in order to get your legs as low as possible. One tip for training a tight straddle handstand is to focus on flexing your hip flexors and bringing your feet towards the ground. This will help lock your legs into the correct position.
Focusing on bringing your feet towards the floor can help lock your legs in position for the straddle handstand.
5. Legs, hips and/or shoulders starting to rotate
Everyone who starts trying to learn a one arm handstand will experience their legs starting to rotate and then falling out of the handstand. It will happen again and again, and it can be very frustrating! In my experience this is usually the result of a chain reaction starting before the legs themselves start rotating. First it is usually the shoulders which start rotating, and then the legs start rotating, and then you fall out of the handstand.

Shoulder rotation
To combat this problem, I recommend you use your ever-faithful handstand buddy: the wall! Enter a wall assisted one arm handstand in the straddle position, or wall assisted and finger assisted one arm handstand. You should make sure you are as far away from the wall as you need to be, so your toes are just barely touching the wall. How far away you are from the wall will vary depending on your flexibility. Toes from both feet should be touching the wall - when one foot starts to come off of the wall, you know that something needs to be adjusted.
Be conscious of your body and feel what you need to do to bring the toes from the foot that have come off the wall, back onto the wall. Get used to making that adjustment, and then progress to trying to prevent the toes from coming off in the first place. When you’ve gotten used to making the necessary adjustments with the wall, you can go back to trying the free standing OAHS.
I find that learning to lock your shoulders in an internal rotation will help, i.e. bringing your elbows towards each other/your elbows are facing your head. As well, not keeping your straddle position tight enough could be the culprit. Again, fixing these issues using the wall will give you more space to focus on fixing them and then going back to work without it.

The best way to combat rotating out of the OAHS is to use the wall and figure out what do do with your body to improve your response to your toes coming off the wall. Drill this so that when you do the OAHS without the wall, you are trained to fix it.
I always recommend using wall assisted drills and freestanding drills together. In my OAHS foundations programs in my app, I approach the OAHS from 4 main directions: entries into OAHS assisted by the wall; free standing entries into OAHS; wall assisted holds; and free standing holds. New concepts should always begin against the wall and then transfer to freestanding training afterwards.
Summary
That’s about it for things to avoid when approaching the One Arm Handstand. Let’s quickly summarize what they are.
How to One Arm Handstand (things to avoid) :
Don’t Ego Train.
train progressively. Trust the process. Don’t try to just go for it every time.
Use the wall.
At any skill level in hand balancing, you should be using the wall as a training tool.
Don’t start OAHS training before ready.
You should have your handstand completely locked down before getting into OAHS and, ideally, your straddle should be good as well.
Don’t think Full OAHS is better than Straddle OAHS
You would be doing yourself a disservice by being a perfectionist and thinking you should only be working on the full, vs the Straddle OAHS. Focusing only on the full will lengthen the time it takes to achieve the OAHS by a lot.
Figure out how to not ‘rotate out’ of the OAHS(use the wall)
A chain reaction, usually starting in the shoulders and then working its way down to the hips, of ‘rotating out’ is usually why people fall out of their OAHS. Use the wall to fix this common issue.
Bonus tip: Be patient!
I mentioned it at the beginning and I will say it again: with the one arm handstand, prepare yourself for a journey. Mastering the one arm handstand is not going to be something you achieve within a few months, but could be something that takes a few years. It is a marathon, not a sprint. Prepare yourself to be working on this movement for a while to come, but know that the day will come, when after all of your hard work and consistent efforts, you will reap the reward. You will be among the elite few that can perform this movement, and you will be grateful for the whole process, with all its ups and downs.

Remember to embrace the journey!