How to Hollowback - Take your handstand to the next level!
The Hollow Back is one of the coolest looking shapes when it comes to moving and calisthenics. But it also requires a huge amount of mobility and strength, in particular shoulder and spinal mobility and strength. I use the hollow back all the time for different variations and combinations and sequences, and it is definitely a smooth-looking and impressive skill. In this guide I’m going to share with you a strategy for approaching the Hollow Back, as well as specific progressions to go through. I’ll also share with you practical directions on form and more. Let’s get into it.
Check out the full hollowback/mexican handstand Video tutorial
The Hollow Back can be performed in two different ways. There is the “B-Boy Variation”, where you are flaring your elbows out, internally rotating your shoulders, sticking your head out, and looking up at the roof.

In this clip you can take a quick look at the differences between the B Boy style Hollow Back versus the Hand Balancer’s style and why I think you’d be better off training the Hand Balancer’s style.
The second way to do it is known as the “Mexican Handstand”, and it is the way that most gymnasts and hand balancers perform the move. In this variation you have straight arms, you emphasize the opening of the thoracic spine more, and you look in between your hands to the floor.

The B-Boy Hollowback vs the ‘Mexican Handstand’. The Mexican Handstand is what we will work towards here as it’s less prone to injury.
While I can’t tell you which one is ‘better’, I can tell you that the risk of injury with the B-Boy variation is much higher. For that reason, I will focus on the second variation - the hand balancer’s variation - in this tutorial. The hand balancer’s variation is also better for transitioning to different movements as part of a sequence. It may take a bit longer to achieve since it requires more thoracic mobility than the B-Boy variation, where shoulder flexion is emphasized to a much bigger extent. But, I think it will be worth training towards the hand balancer’s variation in the long run for the purposes of staying injury free.
When doing any of the variations or progressions that I’ll be introducing in this guide, keep the following in mind:
Push your hands into the ground hard to elevate your shoulders as much as possible
Open up your spine and push your chest out
Look between hands and keep elbows straight

3 important hollow back handstand form cues. Keep these three principles in mind as you work through the Hollow Back progressions!
Before I get into the progressions for this guide I will quickly cover two things you should already be comfortable with:
30 second stable handstand. You should not be struggling in any way to hold a 30 second handstand. You also need to be able to control your shoulder position while in the handstand, i.e. 'shrugging’ your shoulders while in a handstand.
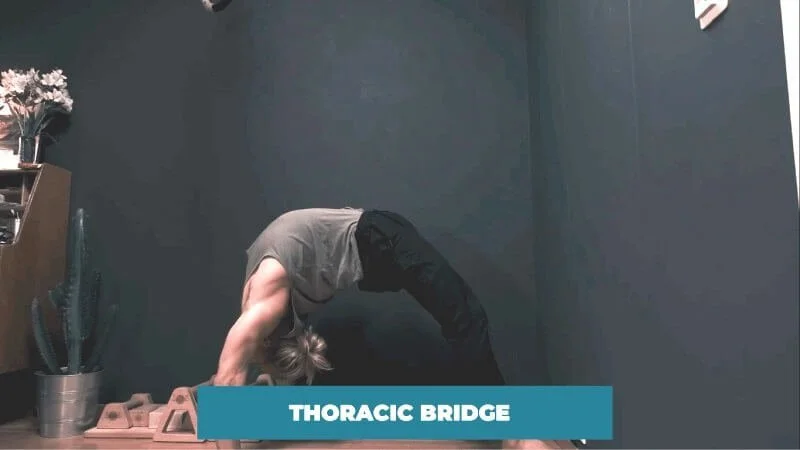
You need to have strong thoracic mobility (as well as shoulder mobility - however this is somewhat a given if you’re able to control your shoulders while in the handstand). Working on our thoracic mobility related to this movement, we will also improve our shoulder mobility. In particular regarding thoracic mobility, you should be able to perform a thoracic bridge.

You should be able to perform the thoracic bridge at least with your feet elevated to hip level or lower, if not on the ground.

Hollow back program and workouts
In my app, I also have workouts for the thoracic bridge as well as upper body mobility, among hundreds of other exercises and fully designed programs of all types for you to check out.

Don’t let not being able to do a Thoracic Bridge stop you from working on the Hollow Back for too long. Head here for the tutorial and get to work! :)
You should feel that you are able to control which part of the spine you are opening up, and you should also be able to look comfortably into the ground. If you find you’re still lacking some thoracic mobility, I do recommend you take a look at my Thoracic Bridge tutorial.
You don’t need to have a perfect thoracic bridge on the ground, but you should definitely have a very comfortable elevated thoracic bridge, with your feet elevated to at least your hips or lower. In this position, you should not have lower back discomfort.
Now that we’ve got the prerequisites out of the way, let’s go over our approach/strategy for achieving the Hollow Back. I like to attack this movement from three angles. These are:
Strength
Balance/technique
Mobility
Balance/Technique
I’ve said this before and I’ll say it again. The wall is your friend. The wall will play a key role in all of the progressions we employ for achieving this movement.
The first progression I recommend drilling for the Hollow Back is the One Leg Half Lay variation. Something to take note of in this movement is that, as opposed to the regular handstand, your arm will be at a bigger/more open angle to the floor when performing this movement. In this variation, you will use the toe of the tucked leg to provide assistance from the wall.

One Leg Half Lay Variation
The second progression I recommend is the One Leg variation. The same principles as used in the previous progression applies, only this time you will use the toe of the extended leg to provide assistance from the wall.

The difference with the one leg variation is that now you are using the other toe to balance on the wall - the toe of the extended leg.
The next progression is the Small Straddle Variation. With this variation, focus on tightening both glutes so as to brace your lower back and protect it against injury. In this case you will be using both toes to get assistance from the wall.

With the Small Straddle variation, use both toes to assist you in balancing. As you train the variation more and more, focus on trying to use the wall less and less.
From the Small Straddle Variation you may move on to the close leg variation, bringing both legs closer together, or you can simply continue training the Small Straddle Variation. I personally think the Small Straddle Variation looks just as cool as the close leg variation, and it’s easier on your back and shoulders.
Of course, with all of these progressions you should always keep in mind to try to gradually use less and less assistance from the wall.
Strength
The focus for building strength for the Hollow Back will be to go from a regular handstand position, to a Wall Supported Hollow Back, and back to a regular handstand, and doing this for repetitions. If you’ve read my planche tutorial, or my front lever tutorial, you’ll already be familiar with Dynamic repetitions.
Keep in mind that for all of these drills where we focus on strength, I recommend you use the Small Straddle variation of the Hollow Back.
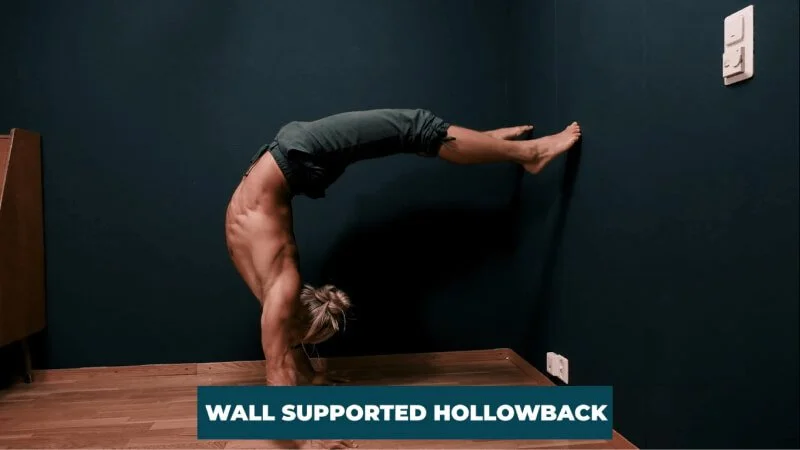
the wall supported hollow back is where you will eventually arrive, by focusing on bringing your hands further and further away from the wall
For building strength for the Hollow Back, we will start with our hands fairly close to the wall, and gradually bring them further and further away from the wall. As your hands get further and further away it will get more and more difficult, and eventually you will arrive at the Wall Supported Hollow Back.

As you get more and more comfortable with your hands being further and further away from the wall, you really want to focus on a nice, controlled entry into the Wall Supported Hollow back, and maintaining that control when returning to the regular handstand. The more and more comfortable you get with the Wall Assisted Hollow Back, the more you can start to try to incorporate free standing training into your sessions.
Mobility
To improve your mobility for the Hollow Back, I recommend practicing your thoracic bridge, alongside the strength and technique/balance drills and exercises mentioned above. Working on getting your thoracic bridge deeper and with straighter legs will be your goal for this exercise. I will not go too much further into the thoracic bridge here, as I do already have a dedicated thoracic bridge tutorial which you may read up on here. I also have a follow along workout for developing the thoracic bridge, so feel free to check that out :).
It’s worth also mentioning that in my newly launched app, I have workouts for the thoracic bridge and for upper body mobility, if you’re still not at the level where you are comfortable training for the bridge. I’ve also just released a Hollow Back workout/module that you can follow to get stepwise progressions for developing your Hollow Back. The app has a 100% free trial period, so you can see if you like it before you pay anything.
Let’s summarize what we’ve gone over here today:
How to train for a Hollowback/Mexican Handstand (Summary)
There are two variations of the Hollow Back ; the B-Boy and the Hand Balancer/Gymnast variation.
I recommend the Hand Balancer variation as it’s less risky injury-wise, although perhaps a little more difficult to achieve.
Prerequisites for the Hollowback handstand:
Before even getting into the Hollow Back, be sure you have a stable 30 second handstand where you can control your shoulders(be able to ‘shrug’ them), and you should be able to perform a thoracic bridge.
technique/balance training
Using wall assisted drills in a progressive manner, emphasising learning to balance the position.
Strength training
Using Hollowback press in a small straddle position, starting at shallow depth, close to the wall, and increasing distance from wall and depth of the holowback press as you get stronger in the position.
Mobility training
Back bending and shoulder flexion mobility - getting an awesome thoracic/back bridge.
That’s all for the Hollow Back, if you have any questions or comments please feel free to hit me up here, on Youtube, or on IG! Take care movers :)